Hardening your VPN Setup with iptables

I’ll be heading out to Defcon 19 next month, so I want my VPN connection to be stable and secure.

You probably know the situation. You’re at your local coffee shop, using their (hopefully not) wide-open unsecured wifi hotspot. But you’re smart enough not to send all your data out over the clear, since there might be malicious script kiddies ready to take your sensitive data and sell it to kids on the street. So you use a VPN. You fire up OpenVPN and connect to your VPN service. Then you start browsing, comforted by the fact that your traffic is encapsulated in a secure SSL tunnel. Better yet, the user experience is transparent: you don’t have to configure your applications to manually use a SOCKS5 proxy. OpenVPN handles your routing tables and creates a virtual interface using the tun module. It’s so simple, you don’t need to think about it. But there’s a problem with this setup.

No one can reach into your stream and extract or insert data, but there’s a caveat. Anyone can destroy your TCP stream by sending you a spoofed RST packet from the remote server, or otherwise making the service unavailable to you. Destroying the TCP stream destroys the virtual (tun) interface, which, in turn, destroys the routes associated with that interface. Now you’re using your physical interface unprotected from those pesky hackers. Worse still, you don’t realize it. Not a thing has changed from the perspective of user experience. Since everything is transparent, you don’t notice any change at all. Now you’re screwed.

Little did you know that this all could have been avoided by our friend iptables. Sure, you could modify your routes further to ensure that only traffic going to the remote server goes over your physical interface, but that’s too easy. Plus, routing tables aren’t intended for security, they’re inteded to move packets along. iptables seems like the tool for the task, so I modified a script I found here to make sure that we disallow any traffic that we don’t want:

#!/bin/bash
if [[ $EUID -ne 0 ]]; then
	echo "This script must be run as root" 1>&2
	exit 1
fi

# name of primary network interface (before tunnel)
PRIMARY=wlan0

# address of tunnel server
SERVER=seattle.vpn.riseup.net
# address of vpn server
VPN_SERVER=seattle.vpn.riseup.net

# gateway ip address (before tunnel - adsl router ip address)
# automatically determine the ip from the default route
GATEWAY=`route -n | grep $PRIMARY | egrep "^0\.0\.0\.0" | tr -s " " | cut -d" " -f2`

# provided by pppd: interface name
TUNNEL=tun0

openvpn --config /my/path/to/riseup.ovpn --auth-user-pass /my/path/to/authentication.conf &

# iptables rules - important!

#LOCAL_NET=192.168.0.0/16
LOCAL_NET=$GATEWAY

# Flush all previous filter rules, you might not want to include this line if you already have other rules setup
iptables -t filter --flush

iptables -t filter -X MYVPN
iptables -t filter -N MYVPN

# Exceptions for local traffic & vpn server
iptables -t filter -A MYVPN -o lo -j RETURN
iptables -t filter -A MYVPN -o eth0 -j RETURN
iptables -t filter -A MYVPN -o ${TUNNEL} -j RETURN
iptables -t filter -A MYVPN --dst 127.0.0.1 -j RETURN
iptables -t filter -A MYVPN --dst $LOCAL_NET -j RETURN
iptables -t filter -A MYVPN --dst ${SERVER} -j RETURN
iptables -t filter -A MYVPN --dst ${VPN_SERVER} -j RETURN
# Add extra local nets here as necessary

iptables -t filter -A MYVPN -j DROP

# MYVPN traffic leaving this host:
iptables -t filter -A OUTPUT -p tcp --syn -j MYVPN
iptables -t filter -A OUTPUT -p icmp -j MYVPN
iptables -t filter -A OUTPUT -p udp -j MYVPN

iptables -t filter -A INPUT -p tcp --syn --dport 8212 -i ${TUNNEL} -j REJECT

echo "nameserver 8.8.8.8" > /etc/resolv.conf

You’ll want to modify the openvpn command, interfaces, and servers to meet your needs. And that’s it! If your stream is taken down, you have these rules to protect you. I have this script as a post-connect hook for any untrusted networks I connect to (wicd is a nice network manager for adding hooks). Later, if you want your traffic to go over the clear again, you can use this script:

#!/bin/bash
if [[ $EUID -ne 0 ]]; then
	echo "This script must be run as root" 1>&2
	exit 1
fi

iptables -t filter --flush
iptables -t filter -X MYVPN

Rooting a router: Wiretapping dd-wrt / OpenWRT embedded linux firmware

Note: The following post is written partially as a follow-up to the presentation I gave on dd-wrt at the December meeting of the Western North Carolina Linux Users Group.

Concept

If you’re running dd-wrt as your router (or OpenWRT, or Tomato for that matter), you already know how powerful it can be. Capabilities such as boosting signal strength, interacting with Dynamic DNS services, running a VPN server, and transitioning to ipv6 all come prepackaged standard edition, running on a mere 4MB of flash memory (and micro running on 2MB!) What I will show you is that using the features commonly bundled with dd-wrt, you can turn your router into a wiretap, regardless of your wireless security. I’ll be dealing specifically with dd-wrt v24-sp2, but you can also wiretap OpenWRT by following similar instructions.

The idea is this: you have a router sitting at a critical juncture in your network infrastructure. Packets are rapidly being routed in and out of various interfaces on the router. If we are dealing with a wireless router with security enabled, the router is an endpoint for this encryption. Which means that the packets will be decrypted upon arrival, before being pushed through the wire. Additionally, the OpenWRT / dd-wrt communities have ported a wide array of Linux projects to the platform. Notably, they’ve ported tcpdump, the powerful command-line packet analyzer, and libpcap, the C/C++ library required for capturing network traffic. Using such a tool at the router level means your network is owned.

There’s a problem though – once we have a capture going, where do we store it? Most of these routers only have extremely limited flash storage space, usually barely enough for the embedded firmware alone. Even those that have more can only store perhaps a few moments of a heavy traffic capture. Where is all that data to go? Well, we’re in luck: dd-wrt has precompiled support for CIFS (also known as SMB), Microsoft’s network sharing protocol. If we’re able to mount a network share, and store our capture there, then we don’t have to worry about storage limitations. We can even install the packages necessary for the capture on the remote filesystem.

Implementation

Let’s start with a base install. We’ll need ssh access, so lets load up the web interface and under Services → Services enable SSHd. The package manager OpenWRT uses is called ipkg. This is not available until we enable JFFS2 under Administration → Management. Next, create a CIFS share on the local machine. Here, our local machine’s ip is 192.168.1.2, and the network share is named “share.” SSH in as root, and issue the following commands to insert the CIFS module and mount the network share:

insmod /lib/modules/2.4.35/cifs.o
mount.cifs "\\\\192.168.1.2\\share" /jffs -o user=username,password=password

Nice, now we have the network share mounted. If you encounter an error issuing the mount.cifs command, double check your ip, share name, username, and password. Since we’ve essentially mounted over the already mounted /jffs, we need to issue an additional command for ipkg to cleanly update:

mkdir -p /jffs/tmp/ipkg
ipkg update

Once ipkg has updated its package list, we can see all that is available to us by issuing:

ipkg list

As you can see, there’s a ton of stuff we can install. At this point, though, I started encountering some problems. When I issued the “ipkg install tcpdump” command, it fetched and installed the required libpcap first. Then, it went to install tcpdump, and threw an error that libpcap wasn’t installed. I tried to install them manually, but that didn’t work either. So at this point I started looking for alternatives. Optware is another way to install packages, using ipkg in /opt rather than /jffs. Following the instructions here, I created a local ext2 filesystem available via the network share:

dd if=/dev/zero of=share/optware.ext2 bs=1 count=1 seek=10M
mkfs.ext2 share/optware.ext2

If you want more space for packages, change the seek parameter. Next, we’ll be mounting this to /opt on the router side. We’ll need to install kmod-loop first, and insert the loop and ext2 kernel modules:

ipkg install kmod-loop
insmod /lib/modules/2.4.35/ext2.o
insmod /jffs/lib/modules/2.4.30/loop.o
mount -o loop /jffs/optware.ext2 /opt

Great, now we have /opt mounted to the remote ext2 filesystem. Get the install script and install it:

wget http://www.3iii.dk/linux/optware/optware-install-ddwrt.sh -O - | tr -d '\r' > /tmp/optware-install.sh
sh /tmp/optware-install.sh

Excellent, now we have the port of optware installed on /opt! Lets run an ipkg update on this ipkg:

/opt/bin/ipkg update

For comparisons sake, lets just look at how many packages we now have available, as opposed to before:

root@DD-WRT:/opt# ipkg list | wc -l
652
root@DD-WRT:/opt# /opt/bin/ipkg list | wc -l
1242

So we’ve almost doubled the amount of packages available to us. And most importantly, no more complications with tcpdump:

/opt/bin/ipkg install tcpdump

Now that we have tcpdump and libpcap, we can dump our packets to the network share:

tcpdump not host 192.168.1.2 -s 0 -w /jffs/network.cap

From here on in, we can open the packet dump with wireshark and find lots of useful information. We can even store the commands in a start-up script in the dd-wrt web interface under Administration → Commands:

insmod /lib/modules/2.4.35/cifs.o
insmod /lib/modules/2.4.35/ext2.o
mount.cifs "\\\\192.168.1.2\\share" /jffs -o user=username,password=password
insmod /jffs/lib/modules/2.4.30/loop.o
mount -o loop /jffs/optware.ext2 /opt
tcpdump not host 192.168.1.2 -s 0 -w /jffs/network.cap &

Implications

Given the wide range of routers supported by dd-wrt/OpenWRT, this is a major security concern. Although this requires physical access to the device in question, there is nothing to stop an attacker from purchasing an identical model of router, installing dd-wrt and tcpdump on it, and swapping a target router with the malicious one. If the attacker already knows the wireless password, the malicious router can be configured such a swap would not draw attention. Resetting the router is no defense – the OpenWRT firmware modification kit can easily modify the firmware image file. Modifying the image file to add code that monitors network traffic would mean that any reset would only be restoring malicious firmware.
Such an attack need not be local. Most ISPs block CIFS traffic, but the router could be made to forward the CIFS ports through an SSH tunnel to a remote endpoint. The stock Dropbear SSH isn’t capable of tunneling, but openssh is available in the ipkg repository, and can be either included in the firmware or installed on the local /jffs space available. Sending all network traffic that goes over the wire to a remote endpoint may be impractical for an attacker, but packet headers still provide a wealth of information.

Swinedroid, Snort Monitoring tool, available on the Android Market

QR Code to Download Swinedroid Client
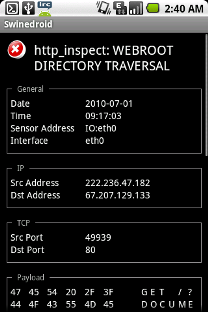
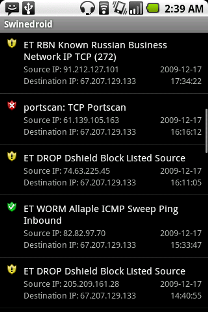
Swinedroid v0.20 has been released is now available on the Android Market. If you haven’t read my previous post about it, here’s the low down. Swinedroid is a remote Snort monitoring application for Android. Currently, it allows you to view server threat statistics, display the latest alerts, search alerts (by alert severity, signature name, time frame) and view alert details (including a hex dump if available). It consists of two components: the client – which runs on your Android device, and the server – which runs on the system you wish to monitor (or a third party server that can access the snort server db port). The server provides statistics requested by the client over a secure and authenticated SSL link.

Since the last (non-market) release, I’ve introduced a server threat graph (thaks to AChartEngine), alert detail breakdown, SSL authenticity negotiation, functional alert browsing, a more helpful launcher screen, and crash fixes.

Swinedroid Server OverviewSwinedroid Alert Overview

Having an Android Snort monitoring application can prove handy for a variety of situations where access to web-based clients is either unavailable or inconvenient. Since this is a monitoring tool that runs natively in Android, it will also be possible to recieve notifications based on alert statistics – a feature I plan to implement at some stage. Also upcoming is alert tagging and deleting functionality, more advanced alert statistics, attacker profiling (including reverse DNS / location information), and more. If you have suggestions, please post your feedback.

Download the client app here.

Download the server here.

Swinedroid – the new Snort Monitoring tool for Android

QR Code to Download Swinedroid Client
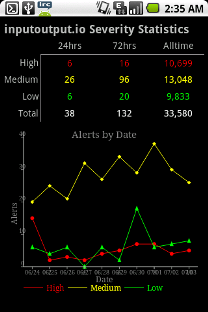
If you’ve ever been on the go when crisis strikes, you know how convenient it is to have a mobile application for dealing with the problems you might face. For instance, I’ve found it really convenient that there’s an application that interfaces with the API for my Virtual Private Server, Slicehost. I no longer have to fumble around with the browser trying find the page which reboots the VPS, I simply load the Slicehost application. This stores my API key, and I’m able to manage my servers in a more streamlined fashion.

It is in this spirit that I began development on Swinedroid. Swinedroid is an Android Snort monitoring and management application. In its current state it allows you to view server alert statistics, display latest alerts, and search alerts based on severity, signature name, and time frame. In the coming months, I plan to add support for viewing alert details (such as the hex dump and whois information), sorting alerts, managing alerts (e.g. tagging or deleting them), and interpreting a variety of Snort log formats.

Here’s the way it works. There are two components: the server and the client. The server runs on any machine that you want to monitor. In order for the Swinedroid server component to work, you need to have Snort installed and logging alerts to MySQL. The client you install on your Android device, and configure it to communicate with the server component. This communication is done over SSL in a secure (but not authenticated) fashion.

Swinedroid overview screenSwinedroid overview screen

The project is still very much in the beginning stages, and there are exciting features to come. Everything is free and open source. I invite you to try it out, and give me your feedback.

Git Repository (Client): git://github.com/Hainish/Swinedroid.git

Git Repository (Server): git://github.com/Hainish/Swinedroid-Server.git

Client Component: http://www.inputoutput.io/files/swinedroid-client_0.10.apk

Server Component: http://www.inputoutput.io/files/swinedroid-server_0.10.tar.gz

Update:
Swinedroid has been released on the Android Market. See this post for more info.

SSL or S-S-Hell?

Broken Key
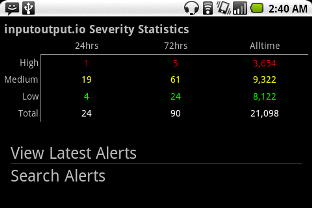
2009’s Beating on SSL, Round One

Hot on the heels of the Microsoft Crypto API patch comes another SSL vulnerability. The last round of attacks on SSL relied on a problem with the deployment of SSL on the web, as the research of Moxie Marlinspike shows. To sum up the crucial point in their research in a nutshell: just because the x509 protocol in web certificates accepts strings such as www.paypal.com\0.thoughtcrime.org without terminating the string, that doesn’t mean your web browser will do the same. We’re able to actually create a certificate signing request (.csr) with www.paypal.com\0 as the subdomain to a domain which we genuinely control. Because of the automated nature of today’s domain (and subdomain) verification process, this will go unnoticed by most Certificate Authority signing processes. Once we get the certificate back from the CA, we’re able to pose ourselves as a man-in-the-middle. Until recently, most browsers would terminate the string at the null character, leaving “www.paypal.com” as the domain for which we’ve been authenticated. Not only is this a theoretical possibility, but Moxie has released tools for it, available at thoughtcrime.org, which are probably still quite effective for unpatched systems.

Round Two: The K.O.

Whereas the null character vulnerability was an issue with web deployment of SSL and certificate chaining, the latest flaw (released on November 5th) seems to be a severe problem with the protocol itself. While there’s been a fair degree of hype surrounding a number of supposed vulnerabilities in SSL, this seems to be the real deal. Specifically, the flaw is in SSL 3.0/ TLS 1.0 – and has something to do with inserting unverified traffic into the renegotiation process of SSL sessions. Marsh Ray of PhoneFactor discovered the vulnerability, which seems to be severe, and “In certain circumstances this flaw could be used in MITM attacks, allowing an attacker to inject attacker-chosen plain text prefix into a secure session of the victim.” The bug has been being worked on for several months, and OpenSSL has released a patch to deal with the bug in its 0.9.8l release, available at www.openssl.org. Again, this is not a problem with deployment, or (as with last year’s Debian SSL vulnerability) distribution-specific forking, it is a fundamental problem with the way SSL renegotiates sessions. Also unlike last year’s Debian vulnerability, which can be retroactively exploited, this exploit requires foreknowledge of the vulnerability and situating oneself as a man-in-the-middle. Exploits are in the wild as of this writing. Kudos to OpenSSL for releasing a patch so quickly.

Using the android browser with tor or any socks proxy & privoxy

Prerequisites:

  1. A jailbroken android install.
  2. Debian Armel on android.
  3. SSHD running in the chrooted debian environment.

Want to browse the web anonymously with your android device, without t-mobile recording your every move? Look no further.

Few are aware that the default android browser actually allows you to use an http proxy to connect to the web. It is a rather obscure setting to trigger, and there are no provisions for you to connect through a socks proxy, such as an ssh tunnel or the tor network. Luckily, privoxy handles all this for us. Privoxy is an http proxy that is able to forward http requests through the encrypted socks tunnel, and out to its intended recipient. In this tutorial, I will show you how to set your android browser to use privoxy, and how to configure privoxy to forward to a socks proxy.

Lets jump right in.

Using connectbot (available from the android market), ssh into your chrooted debian on localhost. Run:

apt-get install tor

This will fetch both tor and privoxy for you. Now, you’ll need to configure privoxy to forward its http requests through tor, or whatever other tunnel you’ve created through ssh (see my previous post, http://www.inputoutput.io/how-to-subvert-deep-packet-inspection-the-right-way/). Append the following line to your /etc/privoxy/config file:

forward-socks5 / localhost:9050 .

Change 9050 to whatever port your tor or ssh tunnel is listening on. Default is 9050 for tor. Now, start tor and privoxy with:

/etc/init.d/tor start
privoxy /etc/privoxy/config

I had to make /dev/null world-writable for tor to stop complaining. You’ll have to run that last part every time you restart your android device. Now on to the annoying part. In terminal emulator (also available from the android market):

su
sqlite3 /data/data/com.android.providers.settings/databases/settings.db
SQLite version 3.5.9
Enter ".help" for instructions
sqlite> INSERT INTO system VALUES (99, 'http_proxy', 'localhost:8118');
sqlite> .quit

Change 8118 to whatever port privoxy is listening on, but that port is the default. Now the browser is configured to use privoxy as its http proxy. Privoxy, in turn, is configured to forward connections through tor or the ssh tunnel. This means your done, congratulations!

If you want to stop the browser from using the proxy at any point, in terminal emulator:

su
sqlite3 /data/data/com.android.providers.settings/databases/settings.db
SQLite version 3.5.9
Enter ".help" for instructions
sqlite> DELETE FROM system WHERE name='http_proxy';
sqlite> .quit

It’s quite frustrating to go through this process every time you want to switch between proxified and raw browsing, so I suggest installing a second browser such as ‘steel’ for your raw connection, and only using the default browser for proxified connections.

VMWare Workstation in BackTrack {3, 4} Live

BackTrack 4

Why?

There’s been a number of situations in the past where, even though I’m perfectly happy running BackTrack as a host operating system, it would nonetheless be sweet to run any number of virtualized guest machines as well. For instance, if exploit code or a tool has been released in Windows (e.g. Ferret/Hamster) but is not yet, or will never be, released for Linux. Or if you want to do research in a virtualized network environment. And of course in general, it’s just a good idea to keep your options open, to sharpen your axe before you go out and chop some wood. My virtualization software of choice is VMWare Workstation, especially the newer versions >= 6.5. I’m not going to go into why I favor VMWare over other options, but suffice to say that they are just the best choice for non-commercial virtualized environments (and, uhm, unity mode is kickass.) So this will be a quick run-through for you to create a customized .lzm file for BackTrack Live with a full and functioning install of VMWare Workstation.

How?

While on the road to creating a customized .lzm file, I was steering for the path of least resistance. Basically, I created a before- and after-install list of files across the entire file system. I then compared the two – the difference being the new files that were created from the install. Copy those files over to a subdirectory structure, and run dir2lzm. Place .lzm file into the appropriate directory, uncompressed at boot time. Done. (Here I have to add a disclaimer: this method probably can be improved upon, since it doesn’t take into account those files which the install did not create, but may have only modified. Perhaps checking modification timestamps would be better.)

Boot up to BackTrack Live, and lets get started:

mkdir ~/vmware-install-tracking/
cd ~/vmware-install-tracking/
find / | sort > before

Now that we have a list of files before the install takes place, it’s time for us to install VMWare. Once you’ve installed it, run it, customize your settings, enter your serial number, etc. Open a few virtual machines. Get your settings to a point where you’re comfortable with them – you won’t be able to modify them again after this point. Close VMWare.

find / | sort > after
diff before after > new_files
cat new_files | egrep -v "^---$" | egrep -v "^[0-9]" | egrep -v "[><] /dev" | egrep -v "[><] /mnt/live" | egrep -v "[><] /proc" | egrep -v "[><] /sys" | egrep -v "[><] /tmp" | egrep -v "[><] /var/run" | egrep -v "[><] /var/lock/subsys/vmware" | egrep -v "[><] /root/vmware-install-tracking/" | cut -d" " -f2 > required_files
echo "/lib/modules/2.6.28.1/modules.dep" >> required_files # don't forget those modules!

The directory in the last line will vary based on current kernel version. At this point we have compiled a list of all the files and directories we need for the .lzm file. But we need a script that will parse through required_files and create a file/directory structure from it. I threw the following together in python, create_filestructure_from_filelist.py:

#!/usr/bin/python

import subprocess, os, sys
if len(sys.argv) is not 3:
        print "Usage: " + sys.argv[0] + " [file list to parse] [destination path]"
        exit()

dest_path = sys.argv[2]
if dest_path[len(dest_path) - 1] is '/':
        dest_path = dest_path[0:len(dest_path) - 1]

try:
        fp = open(sys.argv[1],"r")
except:
        print "Error: Could not open file for reading!"

x = fp.readline().strip()
file_list = []
dir_list = []
while x:
        if os.path.isdir(x):
                dir_list.append(x)
        if os.path.isfile(x):
                file_list.append(x)
        x = fp.readline().strip()

for dir in dir_list:
        if not os.path.isdir(dest_path + dir):
                subprocess.call('mkdir -p ' + dest_path + dir,shell=True)

for file in file_list:
        file_components = file.split('/')
        containing_dir = '/'.join(file_components[0:len(file_components) - 1])
        if not os.path.isdir(dest_path + containing_dir):
                subprocess.call('mkdir -p ' + dest_path + containing_dir,shell=True)
        subprocess.call('cp ' + file + ' ' + dest_path + file,shell=True)

Now all thats left to do is call the script, create the .lzm, and put it in the loadtime modules directory. Make sure the destination path in the script has enough storage space.

./create_filestructure_from_filelist.py required_files vmware-tmp/
dir2lzm vmware-tmp/ vmware.lzm
mv vmware.lzm /mnt/sdb1/bt4/modules/

Reboot to your live distribution. You now have a working install of VMWare Workstation on your BackTrack Live. Enjoy!

A quick tutorial on getting USB EVDO working on BackTrack {3, 4}

I recently attended Shmoocon 2009, and was surprised to find a few attendees asking me how I got my EVDO Sprint Novatel u727 modem working in BackTrack 3. The process should be the same for BT4, which was just released on Friday at Shmoocon. So for convenience sake, I provide the script I use to connect, and the configuration file for kppp.

evdoconnect.sh:

#!/bin/bash
if [[ $EUID -ne 0 ]]; then
echo "This script must be run as root" 1>&2
exit 1
fi
eject /dev/sr0 2>/dev/null
sleep 1
modprobe -r usbserial
modprobe usbserial vendor=0x1410 product=0x4100
sleep 1
nohup kppp -c "Sprint Wireless" > /dev/null 2> /dev/null &

A note that the vendor and product codes will probably need to be changed if you’re using a different provider or card. Contact your provider for this information.

.kde/share/config/kppprc:

pppdArguments=

[Account0]
AccountingEnabled=0
AccountingFile=
Authentication=4
AutoDNS=1
AutoName=0
BeforeConnect=
BeforeDisconnect=
CallbackPhone=
CallbackType=0
Command=
DNS=
DefaultRoute=1
DisconnectCommand=
Domain=
ExDNSDisabled=0
Gateway=0.0.0.0
IPAddr=0.0.0.0
Name=Sprint Wireless
Password=user
Phonenumber=#777
ScriptArguments=
ScriptCommands=
StorePassword=1
SubnetMask=0.0.0.0
Username=user
VolumeAccountingEnabled=0
pppdArguments=

[General]
DefaultAccount=Sprint Wireless
DefaultModem=EVDO Modem
NumberOfAccounts=1
NumberOfModems=1
PPPDebug=0

[Graph]
Background=255,255,255
Enabled=true
InBytes=0,0,255
OutBytes=255,0,0
Text=0,0,0

[Modem0]
BusyWait=0
Device=/dev/ttyUSB0
Enter=CR
FlowControl=Hardware [CRTSCTS]
Name=EVDO Modem
Speed=921600
Timeout=60
UseLockFile=1
Volume=1
WaitForDialTone=1

[WindowPosition]
WindowPositionConWinX=283
WindowPositionConWinY=215

Again, this is simply my personal configuration. These should work quite the same for other distributions as well, provided that your card is connected via USB.

BackTrack 3, the EEE 701, and Disk Encryption

Explanation and Advantages

I recently decided to make BackTrack 3 the primary OS on my pearly EEE 701.  Given my EEE’s whopping 4GB of solid-state storage, I decided that rather than installing BackTrack directly onto the SSD, I would instead install the live distro to an 8GB SDHC card I had lying around, and use the remaining internal 4GB SSD as an encrypted /root partition using cryptsetup.  There are a few distinct advantages of such a setup.  Firstly, since the OS is installed as a live distro on a removable device, portability is not sacrificed – I am still able to boot into BackTrack from the same SDHC card plugged into another machine (assuming, of course, that machines BIOS supports booting from SD.)  Secondly, by overriding the default /root partition which is created by root.lzm, any changes I make to /root are persistent, and do not require a recompression of root.lzm.  This allows me to store application settings and files in a much more convenient manner.  Thirdly, since /root is encrypted, saving settings or files containing passwords or other sensitive information is less of a security risk.

Implementation

To install BackTrack onto the SDHC card, we use the same method as a USB install.  Format the SDHC to contain a vfat filesystem.  Extract the BackTrack 3 USB .iso file into the filesystem mount point, and run boot/bootinst.sh.  I tried this in Ubuntu 8.10, and had some trouble: the device was recognized as /dev/mmcblk0 and the partition as /dev/mmcblk0p1, a designation that shell script got mixed up on.  Running the script on the EEE’s previous OS, Xubuntu 8.04, the device and partition were recognized as /dev/sda and /dev/sda1, and I encountered no further problems.

Once we boot into BackTrack, we configure and install cryptsetup:

cd ~
wget http://luks.endorphin.org/source/cryptsetup-1.0.5.tar.bz2
tar -xvf cryptsetup-1.0.5.tar.bz2
cd cryptsetup-1.0.5
./configure
make
make install

Next, we create a .lzm file for cryptsetup to ensure that it will be available each time we boot:

mkdir -p usr/include usr/lib usr/man/man8 usr/sbin usr/share/locale/de/LC_MESSAGES
cp /usr/include/libcryptsetup.h usr/include/
cp /usr/lib/cryptsetup usr/lib/
cp /usr/lib/libcryptsetup.* usr/lib/
cp /usr/man/man8/cryptsetup.8 usr/man/man8/
cp /usr/sbin/cryptsetup usr/sbin/
cp /usr/share/locale/de/LC_MESSAGES/cryptsetup.mo usr/share/locale/de/LC_MESSAGES/
tar -zcvf cryptsetup.tgz usr/
tgz2lzm cryptsetup.tgz cryptsetup.lzm
cp cryptsetup.lzm /mnt/sda1/BT3/modules/ # my mountpoint was /mnt/sda1, yours probably is too

Now we have cryptsetup available in the live environment.  Next step is to format the EEE’s internal SSD.  I set up one primary filesystem, recognized as hdc1.  We’ll be formatting this with cryptsetup using a secure passphrase.

cfdisk # to set up the partition
umount /dev/hdc1
cryptsetup luksFormat /dev/hdc1
cryptsetup luksOpen /dev/hdc1 root_dir
mkfs.ext2 /dev/mapper/root_dir

And now we have an encrypted partition on the SSD.  Next mount it and copy the existing BackTrack /root files.

mkdir /mnt/root_dir
mount /dev/mapper/root_dir /mnt/root_dir
cp -a /root /mnt/root_dir
mv /mnt/root_dir/root/* /mnt/root_dir/root/.* /mnt/root_dir/
rmdir /mnt/root_dir/root

And we’re almost done.  We’ll create a script to make it easy to mount our /root every time we boot.  Create a file in /root/root/decrypt_root.sh with the following contents:

#!/bin/bash
cryptsetup luksOpen /dev/hdc1 root_dir
mount /dev/mapper/root_dir /root

Finally, create an .lzm file for the script.

cd ~
tar -zcvf decrypt_root.tgz root/
tgz2lzm decrpyt_root.tgz decrypt_root.lzm
cp decrypt_root.lzm /mnt/sda1/BT3/modules/

And we’re finished.  If all goes well, when you restart your machine you will have this script in your /root directory, and once run it will mount your encrypted SSD partition to /root.  From this point, you can issue a ctrl-alt-backspace and re-login, and startx if you’d like.  Welcome to a world of BackTrack possibilities!

How to Subvert Deep Packet Inspection, the Right Way.

Note: I was first inspired to write this post based on the great coverage of deep packet inspection by the Security Now (SN) podcast.  For more detailed information than I could ever provide, please listen to Security Now, especially episodes 149, 151, and 153.

What is deep packet inspection?

In bygone days, the role of an Internet Service Provider (ISP) had been that of a passive provider of content.  The ISP provided the necessary infrastructure to connect your computer with the larger global network of computers, the internet.  When you pay your monthly bill to the ISP, you are paying a usage charge, effectively ‘renting’ their infrastructure to get yourself on the grid.  They did not disrupt, filter, or sell your private information, and life was good.
In 1994, Congress passed the Communications Assistance for Law Enforcement Act (CALEA).  This act required all digital telecommunications carriers to enable wiretapping of their digital switches.  In 2005, CALEA was extended, at the behest of the DOJ, FBI, and DEA, to include the tapping of all ISP traffic.  Prior to this extension, the FBI had relied on court order or voluntary cooperation of individual ISPs, engaging in packet sniffing with programs such as Carnivore.  So the government spying on your net usage is nothing new.
Recently, however, a very disturbing friendship has developed between advertising agencies and ISPs.  Particularly nefarious advertising companies such as NebuAd have been approaching ISPs and offering them sums of money if they will install devices that monitor and even modify the on-the-fly communications to place ads on websites that you visit.  Earlier on, these ads were just crudely inserted JavaScript, sometimes causing a rendering error in the page.  Recently, some companies such as Phorm in Britain have gotten smarter and are using the devices they’ve bribed the ISPs into installing to monitor each and every website you visit.  This is frightening because your browsing habits reveal an enormous amount of information about the type of person you are, and in fact in many cases pinpoint exactly who you are.  So these advertising agencies are effectively logging and storing everything that you do across the web, to build a profile of you for the supposed intent of providing more targeted advertising.  Luckily, there is a way to protect yourself from these invasive policies.

Using SSH to create a secure SOCKS proxy tunnel

Note: My experience in subverting these practices is largely based in using SSH within a bash environment.  You can perform the same actions with Windows using putty as well, but the syntax is quite different, and not my area of expertise.  I suggest using the howto on this page if you are using putty.

Requirements:

  • Remote shell account on a machine running an SSH server
  • An SSH client
  • Programs that allow you to proxy traffic with SOCKS

One very effective way to subvert deep packet inspection is to create a secure, encrypted tunnel that you send all of your traffic through.  The ISPs cannot modify the content of the packets if they are point-to-point encrypted, since they have no way of seeing what the content actually is.  The idea is to wrap the packets with encryption only so far as to get them out of the reach of your ISP, and once they arrive at a remote server that you have shell access to, that server unwraps the traffic and sends it out on its merry way.  Be sure that the remote server that you have access to is secure and trusted.  If it is not, you may effectively be opening yourself to a man-in-the-middle attack or packet sniffing.  If you have access to a remote shell, you can use SSH to create a secure SOCKS proxy on a specific port of your local machine, which forwards all traffic to the remote machine before reaching its final destination.  Simply type:

ssh -D localhost:port -f -C -q -N user@host.tld

where port is the local port you want to open.  When this command is issued for the first time, make a note of the hex fingerprint that is displayed.  If at any time in the future you get a warning stating that there is a fingerprint mismatch or that the fingerprint does not match your known_hosts file, your traffic may be being intercepted.  This fingerprint acts as verification that you are indeed opening a connection to the remote server you intend to communicate with.  Now, if you issue the command “netstat -antp” and if everything went well you will see a new local port being provided by ssh.  If under the ‘local address’ field, your output looks like the following: “127.0.0.1:port” then this port is only accessible locally.  You can now configure programs such as x-chat, pidgin, and firefox to use the ip address “127.0.0.1″ with the port you have specified to enable this proxy.

Word of warning #1: What you gain in privacy on the ISP side, you may lose in anonymity on the remote server side.  For instance, if your remote server has a static IP and your ISP doesn’t, it may be easier for the websites you access to track your browsing habits over time.  One way to counter this is to have a multitude of people use this server as their primary proxy; that way there is no way of pinpointing who exactly is accessing what.

Word of warning #2: When configuring certain programs to use the SOCKS proxy, there is a potential for DNS leakage.  What this means is that even though the traffic between yourself and the remote server is encrypted, the name resolution may not be.  This may present a problem, but certain programs such as firefox allow you to ensure that there is no DNS leakage.  In firefox, browse to “about:config” and make sure the setting for “network.proxy.socks_remote_dns” is set to true.  Certain extensions of firefox such as FoxyProxy take care of this for you in their plugin settings.

Complete SSH encapsulation: the tun module

Requirements:

  • Root access to a remote machine running an ssh server
  • An SSH client
  • The tun module installed both locally and remotely

The problem that I had with the solution in the previous section is as follows.  There are plenty of programs using my network that do not have the ability to use a SOCKS proxy.  Given the track record of the worst of the advertising companies, I wouldn’t put it past them to start intercepting and modifying all sorts of traffic, not only the traffic with the highest volume or visibility such as web traffic.  What is really needed is an all-encompassing proxy, one that just takes all outgoing and incoming traffic and sends it over that secure encrypted link.  SSH is such a wonderfully flexible and versatile program, and it has built-in support for creating a secure VPN to do just that.  The idea is to make it so that all your traffic is routed through the remote server using a secure VPN link.  This section requires a basic grasp of routing tables, kernel modules, and iptables.

So our first task is to establish the secure VPN.  To do this, both machines must have the ‘tun’ kernel module installed and loaded.  Just issue the comman

modprobe tun

on both the local and remote machines from their respective root shells.  Locally, issue the command:

ssh -w 0:0 -f -C -q -N root@host.tld

This command establishes a new network interface on both sides of the connection, tun0.  Then, type:

ifconfig tun0 10.0.0.200 pointopoint 10.0.0.100

SSH into the remote machine, and issue these commands:

ifconfig tun0 10.0.0.100 pointopoint 10.0.0.200
ping -c 3 10.0.0.200

If you get a ping response, you’ve successfully set up a secure VPN!  This is good, but in order to route your traffic through the remote machine, it must be set up to enable packet forwarding, and also to have iptables configured so that it acts as a gateway.  I’ve modified a small shell script for this purpose.  You may need to modify it further to suit your needs:

wget http://www.inputoutput.io/shareconnection.sh
chmod +x shareconnection.sh
./shareconnection.sh

Your remote server is now configured to act as a gateway.  Locally, you must now set up your routing tables to direct all traffic (except the traffic that is still needed to keep the tun0 interface alive!) through the tun0 interface.  The following commands assume that your default local gateway is a router with the ip address 192.168.0.1, and your default interface is eth0:

route add host.tld gw 192.168.0.1 eth0
route del default gw 192.168.0.1 eth0
route add default gw 10.0.0.100 tun0

And presto!  All outbound and incoming traffic is now routed through your remote machine.  Again, the same concern in the above section regarding anonymity and verification of the remote fingerprint applies in this case as well.  Since the remote server is now acting as your gateway, there is no reason to fear DNS leakage, and no programs to configure.  Now you can rest assured that your connectivity is secure from the prying eyes of the ISPs and their sneaky cohorts, the traffic-shaping advertising companies.

My next article will detail how to connect this tunneled interface with programs such as hostap and dhcpd to create a wireless access point providing an automatically proxified connection to wireless clients.